In another article we were talking about winterizing your engine. In this one you can find more information on prepairing your marine engine for spring. The good news: if you did a good job when going into the winter, then this job will not take quite as long.

Photo: webinapage.com
Time to check
First of all check all hoses and hose clamps, fittings, etc., for frost or other damage. If any of your through-hull openings or hoses have been damaged due to frost, you will want to know about it before going into the water again. Similarly, if you closed op all openings in your engine for winter (air intake, fuel tank vent, …), then you should of course open them up again.
Fuel Tank
Drain a bit of fuel from your tank (and possibly your coarse filter) and check that sample on water and any sludge or pollution. If the sample doesn’t look all that good, read Bob’s article on diesel algae.
Anodes
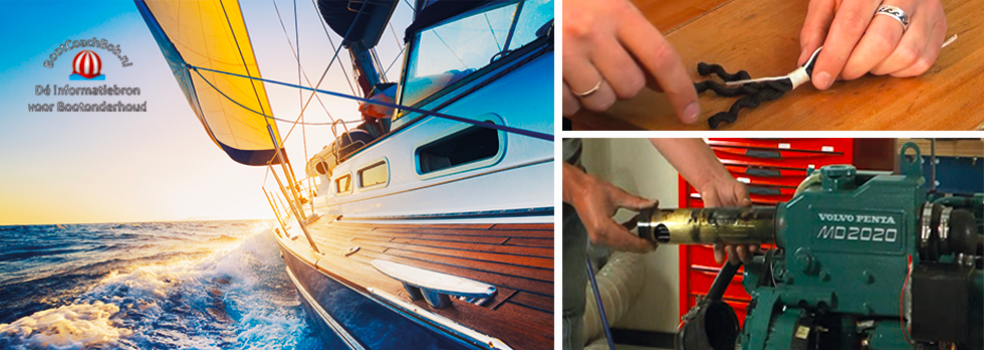
Check the anodes in your engine, if your engine has them. Especially older marine engines have anodes in spefic parts of the engine that come into contact with seawater (eg heat exchangers, …). These anodes are small rods made of zinc or other types of metal, fixed on a screw so that they can be screwed into your engine. These rods make sure the inside of your engine is not affected by galvanic corrosion. After disassembling the anode, you can remove the metal that has already corroded on the anode by tapping it gently with a hammer. However, if more than half of the anode is eaten away, the time has come to get yourself a new one.
Of course, anodes can also be found on the outside of your boat, e.g. on your hull, on your saildrive, on your prop shaft, etc. Check if these anodes haven’t corroded for more than 50%. If this is the case, replacing them is the most sensible thing to do.
Antifouling
Wet sand the hull below the waterline, so that you get the surface clean and rough. First find out just where the area in your marina is where you are allowed to sand. In most marinas it is not permitted to sand antifouling just anywhere. Do not sand your hull with dry sandpaper, but use abrasive pads you can wet. Sanding dust particles of antifouling paint are very toxic, so you really don’t want to inhale them or get too much of them on your skin/eyes/… Wear gloves and a mouth mask (and really preferably a respirator) when you’re working with antifouling. I myself always use vinyl or latex gloves while sanding/painting/… : after finishing your job, you won’t need to put thinner or some other solvent on your hands to get off the paint, sand dust, … Just washing your hands after the job is usualy enough. Quick, easy and safe …
After sanding, paint the hull with antifouling. Make sure the antifouling you’re using adheres well to the previous layer. The easiest way is just using the same brand and type of antifouling as last time. If you plan on switching brands or types, read the antifouling user guide to see what other types of antifouling the new antifouling adheres to well. Make sure not to paint your anodes with antifouling, because it drastically reduces the effectiveness of the anodes. If you have a saildrive, beware as well; the aluminum saildrives are made of doesn’t react well to (copper-containing) antifouling. So in order to prevent your saildrive from seriously corroding, treat it with a protective paint before applying antifouling to it. Most antifouling paint producers also have this protective paint in their product range, so you’ll find more information in their product brochures.
Cooling system
Install the impeller after you’ve greased it with waterproof grease (such as Vaseline). Fill your seawater system with water (e.g. by pouring water into the raw water strainer untill it is full), to ensure the impeller doesn’t run dry for too long. This is especially important if you have drained your cooling system before winter. If you have winterized your cooling system by flushing antifreeze through it, try to collect the antifreeze coming out your exhaust hole by hanging a bucket under it when you restart your engine for the first time after winter. Note: I have actually never really succeeded in doing this properly, since the exhaust hole on my boat is very difficult to reach once the boat is in the water (…and a lot of cursing echoed through the marina 🙂 …). It is therefore more advisable to use a non-toxic antifreeze (propylene glycol) so that you don’t harm the environment with your first spring start (see the article on winterizing your engine).
Battery
Check the voltage on your battery. If it’s less than 12 to 12.5 V, give it a good charge before you crank your engine, since cranking the engine asks a significant electrical current from your battery.
Fan belt
Check the tension of your V-belt, tighten it if necessary.
It’s now time to go and get that boat into the water !
Oil System
You’ve probably changed the oil before winter and the new oil has circulated thoroughly through the engine. The oil has protected your engine nicely all winter long. Now, in spring, check the oil level just to be sure. After this, the most important thing is to first build up oil pressure in the engine before you start the engine. You can build up the oil pressure by putting the contact switch in the ‘on’ position (which in most recent engines starts the oil pump within the engine). Watch the oil pressure gauge closely. If your oil pressure still doesn’t rise as expected, you can ignite the engine with the stop lever pulled out until you see the oil pressure gauge rise.
Let’s go!
Then finally you can start the engine and let it heat up (don’t forget the bucket under your exhaust to collect the antifreeze). Keep a close eye on your gauges (oil pressure, temperature, …). Also check if there is enough water coming out of the exhaust and finally check in the engine room for oil, fuel, or coolant leaks.
Do you have a tip to add? Leave a comment below !